Subscribe For Free Updates!

We'll not spam mate! We promise.

Saturday, October 19, 2013

Add Meta Description In Every Post In Blogger

Blogger Meta Description
As you all of you knows that in the new Blogger interface the search preferences section is added which helps the user to make his/her blog more search engine friendly. That section really contains such great things and from today I'm going to discuss with you on each and every part of search preferences section. Well, So today we're going to learn the first part of search preferences which is Meta Description. In the old interface we were unable to use meta description in each and every post, we only used to add that description to homepage only by manually. But now every one can add it in every post and page without touching any HTML or XML coding. You just need to enable it from search preferences section.

What is Meta Description?

Meta description is an HTML or XML element that describes the web page to search engine's crawler. In other words it tells the information about your web page to search engine's crawler so that search engine may provide your web page in search results on proper place. It also shows in the search results page so that the user may know that what kind of page it is. 

Adding Meta Description In Every Post With Blogger

By default in blogger that is disable so we'll need to enable it after that we can use it. In this section the meta tags will enable for homepage only and the last section of this will show you that how can you use these tags for every post. Simply the follow the below steps.
  • Go To Blogger >> Settings >> Search Preferences
  • Look For Meta Tags Section and Tick "Yes" To Enable It.
  • Now a box will appear where you have to write your meta tag or description. Make sure that it doesn't exist 150 characters.
  • Click Save Changes!
Now here is one problem! If you are using custom blogger template then continue reading this. The problem is that sometimes custom blogger templates doesn't work with these meta tags but if you are using blogger default template then it's fine. In order to work properly meta tags with custom blogger templates you will need to insert an short XML code in your template which we will solve this issue. Simple follow the below steps.
  • Go To Blogger >> Template >> Edit HTML
  • Search For <head> and Paste The Following Code Below <head>
<b:if cond='data:blog.metaDescription != &quot;&quot;'>
<meta expr:content='data:blog.metaDescription' name='description'/>
</b:if>
  • Save Your Template and You have successfully added meta tags for homepage.
  • Now let's jump to next step. 

Adding Meta Tags In Every Post

After enabling meta tags for homepage, it's time to add these tags in every post. Now when you will go to any post editor or create new post, You will see "Search Description" section in the sidebar where you have to simply write your description for that post. This search description section was disabled but after enabling for homepage it is also enable for every post and page. 
Write your description for every post in that box and publish it. Is it not so easy?

What's More?

So Friends, That was our first part of search preferences settings which was really pretty easy and so useful. In our next posts we'll talk on each part of search preferences and soon we'll complete the Blogger SEO. If you are facing any problem then leave a comment below. Be in touch with us for more and also subscribe us. Take a lot of care of you and your family. 

Make a Blogger Template SEO Friendly

SEO Optimize Blogger Template
Blogger is a popular CMS which is being used by millions of Bloggers. The best thing of it is that it is owned by Google which helps the web masters to engage their blog with Google and get more traffic from Google. There we can also install custom templates but one thing, most of templates are not SEO optimized because these are designed by different developers. So if you are also using any custom template or default template then you should check that it is search engine optimized or not. If no then you will have to optimize it for getting handsome traffic and improving errors in web master tools account. So in the today's tutorial we are going to learn that how can we make our Blogger Template SEO friendly.

In order to SEO optimize any template we need to do little changes in different part of our template. Below I'm going to discuss that all. You just need to read it carefully along with following the simple steps.

Display Post Title First In Search Results

Have you ever noticed that your post title appears after the blog title in search results ? If yes then continue following this section. First of all look the at the example below.
After seeing the above image, I think you have got my point. The reason why post title should appear first in search results is that when someone is going to search any content he will read the only few beginning words of title now if that words are matched with the content which he/she need then you will enter to that page otherwise he will leave it. In order to display post title first in search results simply follow the below steps.
  • Go To Blogger >> Template >> Backup Your Template
  • Click Edit HTML and Find For Below Code.
<title><data:blog.pageTitle/></title>
  • Replace The Above Code With The Following Code 
<b:if cond='data:blog.pageType == &quot;item&quot;'>
<title><data:blog.pageName/> | <data:blog.title/></title>
<b:else/>
<title><data:blog.pageTitle/></title>
</b:if>
  • Save Your Template & You Have Done! 
  • Let's Jump To Next Step.

Adding Meta Description & Keyword Tags

So, This is another section our post and in this section we're going to add meta description and keywords tags in your blog which will tell the search engine's crawler that in which category your blog is based. It will also help the search engines to show your blog's posts on proper keywords. In order to add meta description and keyword tags, Simple follow the below steps.
  • Go To Blogger >> Template >> Edit HTML
  • Find For <head> and Paste The Following Code Below <head>
<meta content='YOUR BLOG's DESCRIPTION GOES HERE' name='description'/>
<meta content='KEYWORDS GOES HERE' name='keywords'/>
  • Replace YOUR BLOG's DESCRIPTION GOES HERE With Your Description and KEYWORDS GOES HERE With Your Keywords
  • The maximum characters for description is 150 characters and also 150 characters for keywords.
  • Finally Save It !

Optimize Post Title Using H2 Tag

This is said by many professional bloggers that we should use H2 tag in our post titles for better search engine optimization. By default in Blogger, H3 tag is used for post title but using H2 tag will be better. To use H2 tag in post title just follow the below simple steps.
  • Go To Blogger >> Template >> Edit HTML
  • Find For Below Code
    <b:if cond='data:post.title'>
  • You Will See Something or Similar Code Like The Image Below 
  • In the above image you can see in starting that post title starts with H3 tag now you just need to replace H3 with H2 and also replace the ending tag </h3> with </h2>. After replacing you code will look like below image.
  • After optimizing post title, Just save your template and you have done!
  • CONGRATULATIONS! Your Template is successfully search engine optimized!

From The Editors Desk

I'm happy to know that you've successfully search engine optimized your template. I hope this little long tutorial will bring huge benefit to you and your blog. Facing any problem ? Always feel free to ask in comment because your comments are always appreciated. Be in touch with us for more and also subscribe us. Take a lot of care of you and your family. Peace!

How To Use Blogger ? - Complete Guide For Newbies

Blogger

What is Blogger?

Blogger is a popular CMS (Content Management System) which is owned by Google. People use to join it for sharing their content online through creating a blog. Blogger gives you full control of your blog to manage or run it easily. You can say that it is a web based tool that helps to create and publish a blog instantly. You will not need much knowledge about coding to create a blog on Blogger because it works like an editor. However, If you have knowledge about coding then you can further feel easy to edit or design your blog.

How To Use Blogger ?

This is not so difficult as you think. Below I've listed a complete guide for newbies. So go and get it now!

Creating a Blog

In order to create a blog, You will need to join Blogger first with your Gmail account. So join it and login to your account there to start. Follow the below steps to create a blog.
  • Login To Your Account
  • Click on "New Blog" Button on Left Side
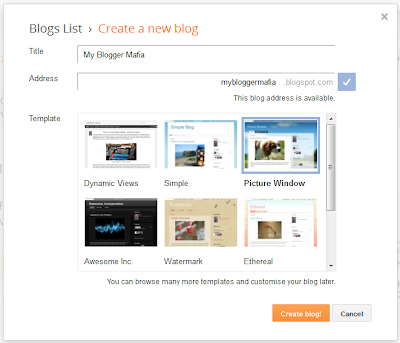
  • Now a pop up will appear where you will be asked for a few things which are explained below.
  • Title : Here you have to write the main title or the name of your blog which you are going to create.
  • Address : In this text area, You have to write the address of your blog and must check that it is available. This will appear in the address bar of the web browser and by this someone can enter into your blog.
  • Template : So, here you have to choose the theme or design of your blog. Click on anyone template to choose it.
  • Now after filling all these things, You have to click on "Create Blog" orange button which is placed at the bottom. So you have now created a blog. Let's jump to the next step.

Creating Posts

After creating a blog, The next step is the creating posts. Creating posts mean to build your content for online publishing. There in Blogger, You have to create posts on any topic which you want to publish. So let's begin that how can we create a post.
  • In order to create a new post, Click on "New Post" button with pencil icon.
  • Now you will be entered in the Post Editor and let's learn this post editor.
  • Post Title : You can see the text area on the top, where you have to write the topic or post title of your post and it will be the heading of that post or topic.
  • Post Body : You can see a long box which is post body and in that box you have to write, create, edit or create the shape of your post by using the tools.
  • Tools Menu : Below post title you can see there is tools menu by which you can make your post. In that tools menu, You can change or edit the text style, font, heading, bold text, italic text, underline text, color, background color and many more. You can also add image, video and blockquote with the help of that tools menu. 
  • Compose | HTML : These are two tabs which are placed with the tools menu. In the compose tab, You can make your post with the help of post editor and in the HTML tab, You will have to make the post by coding. So it's your choice that which method of creating post you choose.
  • Labels : This thing is placed in the right sidebar or in post settings. In the label box, you have to add the sub-category of your post. It mean you can categorize your posts by using labels.
  • Permalink : In the permalink, you can create the custom URL of your post. That URL will be only for that single post and you can also use automatic system to create your post's URL.
  • Publish, Save, Preview and Close Buttons : These buttons are added on the top right corner for the better navigation. The Publish button will publish your post on your blog. Save button will save your post in drafts and you can use Preview button to know that how your post will look like.

Creating Pages

You can create pages by going to your blog's Pages page. There click on new page drop down menu and choose the Blank Page. Now the editor will come which looks like thePost Editor. There you can edit or create the page and publish it. But one thing I want to tell you that Pages and Posts are different. You have to create posts for the content which you will provide on your blog and you can only create specific pages like about us, contact us, privacy policy with the help of pages section.

Comments Section

So in this section, You can see your all blog's comment. There are three sub-sections in comment section which are explained below.
  • Published Comments : In this section you can delete or add in spam those comments which are published on your blog.
  • Awaiting Moderation : In this second section you can publish or delete those comments which are awaiting moderation. 
  • Spam : So in the third and last section, you can control those comments which are caught in spam. 

Stats

Blogger Stats
In the stats page, You can get the fully report about the visitors of your blog. How many visitors and page views you got in month, a day, from where your visitors are coming to your blog, which are the most popular posts of your blog and many more things about your visitors will be displayed here in stats page.

Earnings

Well, here you will get the report about your earnings. How much you have earned this month, today and how much clicks your got, all the reports about your earning will be displayed here but you will need to add Google AdSense account in your blog. After that your earnings will be reported there otherwise there you will be invited for joining Google AdSense.

Layout

So here you will see the layout of your blog where you can see the elements of your blog. You can add, edit, drag or arrange the gadgets of your blog with the help of layout page. In order to edit any element or gadget, you will have to click Edit a little link which is placed at the bottom right corner of every widget and make the changes which you want. For replacing the elements or gadgets of your blog, simply click on any gadget and drag it where you want to place it and then click save to complete to process.

Template

In this page, You can edit or customize the theme or design of your blog without the use of coding. You will simply need to use the Blogger Template Designer to edit the theme of your blog. However, if you want to edit it with coding then you can further use HTML Editor to edit it. You can also change the theme of your blog there and backup and restore options of your blog template are also available there.

Last Words

So friends, It was our Blogger.com. After reading the above full article, I hope you have got something about Blogger. In fact, these are the basic things about Blogger and we'll give the article on every topic about Blogger in future. So friends, keep posting more and more posts on your blog that will success you and also stay connected with us for more little things about Blogger. Take a lot of care of you and your family.

How To Download a Complete Backup Of Your Blogger Blog

Complete Backup Of Blogger Blog
Most of the newbies in the blogging world enter into the blogging world with "Blogger" platform to get started in blogging. The reason is simple, It's free of hosting by which we'll save our money, search engine friendly which helps to drive more traffic, fastest server because it's on Google's own server and a lot. But the worst thing about Blogger is its automated classification system which detects the spam blog posts and comment and removes them. Actually, This is for the safety of us but in another way, sometimes it wastes our hard work by deleting the whole blog. If you're using Blogger as your blogging platform, then I recommend you to always take complete backup of your blog in order to be safe from that classification system. So here I'm going to guide you on how can we get the complete backup of a blogger blog.

Why To Download Complete Backup Of Blogger Blog?

This question might be arrived in your mind that why we should download a complete backup of our blog. So let me give you a brief reason for it. The reason it that Blogger has automated classification system which is really strict in its rules and if your blog get caught by it then your blog can be deleted without any warning. So if we've a backup of our blog then our hard work can't be wasted but if no backup then all the hard work goes into the water. The second reason is that if someone hacked your Blogger account and deletes the whole blog of you then what will you do? You will try to contact Google for giving your account back to you but unfortunately if didn't get your account back then can you tolerate to get your hard work in water? I think No. So, Complete backup of a blog can also help us here. 

Download Complete Backup Of Blogger Blog

I don't think this is any difficult task but you may need hint to do this task. We need to download two things from your blog. The first thing is the template and the second thing is the whole content of your blog. So let's begin with the first step.

Backup Blogger Template Of Your Blog

  • Go To Blogger >> Template
  • Click On The Backup/Restore Button At The Top Right Corner.
  • Now a Popup Will Appear Where You Can Download and Restore Your Template.
  • Simply, Click "Download Full Template" Button.
  • So, Now After Downloading Template, Let's Jump To The Next Step.

Download Whole Content or Blog

  • Go To Blogger >> Settings >> Others
  • There You Will See "Blog Tools" Area On The Top.
  • There Will Be "Export Blog" Button, So Click It To Export or Download Your Blog.
  • When You Will Click The "Export Blog" Button, A Popup Will Appear Same Like As Clicking On Download/Restore Button.
  • But Here You Can Only Download Your Blog, So Click On "Download Blog" Button.
  • Now Wait a Bit, It Will Take Some Minutes To Download Your Complete Blog.
  • That's All!

Final Words

I don't think this was any difficult tutorial. It was really easy but if we come to the article then you might don't know that information. So, This post depends on the information which I've given. And I hope you've got something new to learn in this little post. Facing any problem? Feel free to ask in the comments because I'm always here to help you. Please share your views about this post in the comments and also share it with your friends. Cheers!

Friday, October 18, 2013

Add Email Subscription Box In Header With Social Icons

Header Subscription Widget
Previously, we've created some widgets which were Socializer WidgetEmail Subscription Widget  today we gonna share an other optimized wedget with all you guys. This is the best widget to increase the email subscribers instantly and the main thing is it's place. In header, it will be shown to every one and there will be a lot of chances that any visitor may subscribe you through that widget. Even you can see that we've also added the subscription widget in header. Installing this widget in your blog is not so difficult but before the tutorial let me tell you something about that widget.

Header Email Subscription Widget With Social Buttons

This is the stylish and clean header email subscription widget in which social buttons or icons are also available for increasing social followers. This widget is divided into two sections. Left portion of this widget is having subscription form where Name and Email field are implement along with the subscribe button. Heading and a little spam message is also available in that area. While right portion of this widget is having the social buttons which are Facebook, Twitter, Google+, Feed burner and Pinterest. This widget is gonna obviously help you in increasing your email subscribers and social fans because this will be implemented in the header and header is the great place for attracting your visitors for subscribing you.

Tutorial

Well, I've told you something about this widget and now you may be want to implement it in your blog. Don't worry you can do this just following the simple steps below.
  • Go To Blogger >> Layout >> Add a Gadget (In The Header Area)
  • Choose HTML/JavaScript and Paste The Following Code In The Content Box
<style>

 #byard-topsubsbox {background:#fff; width:940px!important; height:90px!important;margin-top:20px; padding:10px;box-shadow:5px 5px 5px #ccc; border:1px solid #ddd;overflow:hidden;}
  #subscriptionsection {float:left;border-right: 1px solid rgb(168, 168, 168);padding-right: 56px;margin-top: -10px;padding-top:9px;}
  .subsbox-heading {font-size:20px; font-family:&#39;Source Sans Pro&#39;; text-align:center;text-shadow:1px 1px 1px #ABABAB;font-weight:bold;}
  .topsubsboxname {background:#fff url(https://blogger.googleusercontent.com/img/b/R29vZ2xl/AVvXsEjprG5OeHwLVmAfjHOd70Deagl3GhP7stx80Kt80G7xoZO9eJANkn19PZYoXKgJv5CyRKEzz72m5r7rvcOx7cEGoWPpT9Gji4j2gC9LEpsFAOa392r2VvBFE72olyyKome5y3V2UMZckT8/s320/name.png) no-repeat 7px 8px;border:1px solid #ddd; font-family:Arial,sans-serif; font-size:13px; font-weight:bold;color:hsla(0,0%,27%,0.69); width:150px; margin-top:10px; height:24px; padding:5px 15px 5px 28px; vertical-align:top; display:inline-block;margin-left:15px;}
  .topsubsboxemail {background:#fff url(https://blogger.googleusercontent.com/img/b/R29vZ2xl/AVvXsEi-LU4_Ros9840GyKgi1-LvPW_Ird6GnZMJyAE4vM2BERibJMx_lUcJp88Oe2Nq6J8fcvSLwkwgtwVa6d7XLn_65ILLJY62nnESuQc6v1ksVWaCFlX14fJqs46xxnQ5xwLnyl9-leg4ANo/s320/email.png) no-repeat 7px 10px; border:1px solid #ddd; font-family:Arial,sans-serif; font-size:13px; font-weight:bold; color:hsla(0,0%,27%,0.69); width:150px; height:24px; margin-left:5px; margin-top:10px; padding:5px 15px 5px 28px;vertical-align:top; display:inline-block;}
.topsubsboxname:hover,.topsubsboxemail:hover {border:1px solid #bebebe; box-shadow:0.5px 1.5px 2px rgba(5,95,255,.1);}
.topsubsboxbutton {-moz-box-shadow:inset 0px 1px 0px 0px #bbdaf7;-webkit-box-shadow:inset 0px 1px 0px 0px #bbdaf7;box-shadow:inset 0px 1px 0px 0px #bbdaf7;background:-webkit-gradient( linear, left top, left bottom, color-stop(0.05, #00B3FF), color-stop(1, #349ECB) );background:-moz-linear-gradient( center top, #00B3FF 5%, #349ECB 100% ); filter:progid:DXImageTransform.Microsoft.gradient(startColorstr=&#39;#00B3FF&#39;, endColorstr=&#39;#349ECB&#39;);background-color:#00B3FF;  margin-top:12px;  margin-left:5px;-moz-border-radius:6px;-webkit-border-radius:6px;border-radius:6px;border:1px solid #84bbf3;display:inline-block;color:#ffffff;font-family:arial;font-size:15px;font-weight:bold;padding:6px 10px;text-decoration:none;text-shadow:1px 1px 0px #528ecc;}.topsubsboxbutton:hover {background:-webkit-gradient( linear, left top, left bottom, color-stop(0.05, #349ECB), color-stop(1, #00B3FF) );background:-moz-linear-gradient( center top, #349ECB 5%, #00B3FF 100% );filter:progid:DXImageTransform.Microsoft.gradient(startColorstr=&#39;#349ECB&#39;, endColorstr=&#39;#00B3FF&#39;);background-color:#349ECB;}.topsubsboxbutton:active {position:relative;top:1px;}
  #socialsection {float:left;margin-top:20px;}
  .socialheading{font-size:20px; font-family:&#39;Source Sans Pro&#39;; text-align:right;margin-right:20px;text-shadow:1px 1px 1px #ABABAB;font-weight:bold;}
  .socialicons ul {list-style:none; display:inline;float:right;margin-top:10px;margin-right:10px;}
.socialicons li {opacity: 1;float:left;padding: 0px 10px 0px 0px;}
.socialicons li:nth-child(6) {padding: 0;}
.socialicons li a img{height:49px;width:49px}
</style>

<!-- Top Subsbox By Www.BloggerYard.Com Start -->
<div id='byard-topsubsbox'>
<div id='subscriptionsection'>
<div class='subsbox-heading'>Subscribe For Free Updates!</div>
 <form action='http://feedburner.google.com/fb/a/mailverify?uri=BloggerYard' class='byard-subsbox-form' method='post' target='_new'>
  <input class='topsubsboxname' name='name' onblur='if (this.value == &apos;&apos;) {this.value = &apos;Your Name&apos;;}' onfocus='if (this.value == &apos;Your Name&apos;) {this.value = &apos;&apos;;}' value='Your Name'/>
  <input class='topsubsboxemail' name='email' onblur='if (this.value == &apos;&apos;) {this.value = &apos;Your Email Address&apos;;}' onfocus='if (this.value == &apos;Your Email Address&apos;) {this.value = &apos;&apos;;}' value='Your Email Address'/>
  <input class='topsubsboxbutton' type='submit' value='Sign Up!'/>
 </form>
  <p style='margin-top: 8px;font-size: 13px;text-align: center;font-family: Source Sans Pro;font-style: italic;font-weight: 600;'>We&#39;ll not spam mate! We promise.</p>

  </div>
<div class='socialicons'>
  <div class='socialheading'>Become Our Fan on Social Sites!</div>

<ul>
<li><a href='https://www.facebook.com/BloggerYard'><img src='https://blogger.googleusercontent.com/img/b/R29vZ2xl/AVvXsEhVkqIEMZ_0fU_uH7j5t4vQoGqkW1AMU7hcIs3QCaUcoDKXm6ag8kTymTVzwcs597i3FP8oVwjfmZWdA1889eY3Wg5Fl1ZueC8p6WKHfD5aiO7EZrKC1Mzt-gEh2uoHdvm3zxWQEpGF5wRi/s1600/facebook_64.png' title='Facebook'/></a></li>
<li><a href='https://twitter.com/BloggerYard'><img src='https://blogger.googleusercontent.com/img/b/R29vZ2xl/AVvXsEilAD3cFo7NfKHEol5ycM0aNlkb_8UYxr6mXSKIQ7OhFWTuvrEIVxwRT9e-rSXlahtxJf_zPd2UAf_g35LM2p_SW-VNMSaFtL0h0AEqw5IsWyUL1EUopKUjKRNFFr0Zf-ltMxzv5E9gjNci/s1600/twitter_64.png' title='Twitter'/></a></li>
<li><a href='https://plus.google.com/101996924620264617682/'><img src='https://blogger.googleusercontent.com/img/b/R29vZ2xl/AVvXsEhVgyLZkPw44FY6NGKgQfwtcMHXNIz_EoZ8NVT1Xof5fqRfapwnRU2XcNV8zS5B3KIXDce0aiv0aBlAwhg6RaM309wIrT5hMb7pYIVVtOl-4cPR9tadjQ0h50_9zoEnlBaCtRypsfdfb-hw/s1600/google-plus_64.png' title='Google +'/></a></li>
<li><a href='http://feeds.feedburner.com/BloggerYard'><img src='https://blogger.googleusercontent.com/img/b/R29vZ2xl/AVvXsEhqPjRqauXfE9F32KrP1N3VbQ-SDbOBBj7afrk0PQY1eMDIX2gdeAb_kcuED5Zn8bh8QZ-8R3A-OlFghyZYaPGbFei8SG8_Vtoph2olgUDUL2wtHC1oodTnxCAc2JtTFOtxIEne2O6hY9WB/s1600/rss_64.png' title='Rss'/></a></li>
<li><a href='http://pinterest.com/yaqoobhisbani/'><img src='https://blogger.googleusercontent.com/img/b/R29vZ2xl/AVvXsEiI2kpekd7IZZ2KiOSu8qSoB6FK2HFyWlIgiw7zDQFt3XXq2P3GaaXCpdQtswb7Ikza57FtC4aiPARR57BChXOlsM1fSYCdxe0A0hbZk9GElcqaf_1guKDv-pB-fcv2s4YipCznKEXDxPtq/s1600/pinterest_64.png' title='Pinterest'/></a></li>
</ul>  </div>
    </div>
<!-- Top Subsbox By Www.BloggerYard.Com End -->
  • Replace The Highlighted URLs With Yours
  • Click "Save" and You've Done!

Final Words

So friends this was our third resource which is an stylish subscription widget for header. I hope you've liked this widget and you're using this in your blog. However, If you wish to share this with your readers and you can share this but you'll need to link back us as credits. Any problem? let me know in comments. Take Care. Happy Blogging!

Newsletter Email Subscription Widget For Blogger

Newsletter Email Subscription
After releasing our first widget which was "Socializer Widget" here we're back with our second widget. Socializer Widget was pretty cool and having awesome effects with gorgeous button which we've shared with you and we hope that you're using it. But now today we've developed a simple and clean widget which is Newsletter Email Subscription Widget. This widget will help you in increasing the email subscribers. Email subscribers play important role for a blog. They help your blog in getting high number of page-views and daily visits. Not only they help in traffic, But they also give support in getting approval from BuySellAds and Google AdSense or on any other advertising networks. It means these networks also check the email subscribers.

Newsletter Email Subscription Widget

This is a clean, simple and attractive widget which is obviously going to help you in building the email subscribers list. This widget is build with only two programming languages which are CSS3 and HTML. After developing this, we've checked it in several most popular browsers and we came to know that it's working pretty cool in every browser. It consists of a title on the top, little description along with cool icon to tell the subscriber that what he will receive, two input fields which are Name and Email Address, a little line for telling your visitors that we'll not spam and in the last, an awesome Sign Up button. This widget is having 500 pixels width, So the best place for adding this widget is below every post. There you have more chances of getting new subscribers. Before you get this widget in your blog, have a live look on this widget by pressing the below button.

Adding This Widget In Blogger

  • Go To Blogger >> Template >> Backup Your Template
  • Click Edit HTML and Search For Below Code
<data:post.body/>
  • After Finding The Above Code Paste The Following Code Below <data:post.body/>
 <b:if cond='data:blog.pageType == &quot;item&quot;'>
<!-- Newsletter Widget By Www.BloggerYard.Com -->
<style>
#byard-subsbox {
height:300px;
width:500px;
background:hsla(0,0%,95%,0.4);
padding:10px;
border:5px solid hsla(0,0%,67%,0.19);
border-radius:10px 10px 10px 10px;
}
#byard-subsboxh3 {
text-align:center;
margin:10px;
text-transform:uppercase;
font-weight:bold;
font-family:&#39;Merienda&#39;;,cursive;
font-size:1.4em;
letter-spacing:1px;
}
#byard-subsboxheader {
border-bottom:1px solid #ddd;
border-top:1px solid #ddd;
font-size:16px;
padding-bottom:10px;
font-family:&#39;Marmelad&#39;,sans-serif;
text-align:left;
}
.byard-subsbox-form {
padding:20px;
}
#byard-subsboxheader img {
padding-right:10px;
}
.byard-subsbox-name {
background:#fff url(https://blogger.googleusercontent.com/img/b/R29vZ2xl/AVvXsEjprG5OeHwLVmAfjHOd70Deagl3GhP7stx80Kt80G7xoZO9eJANkn19PZYoXKgJv5CyRKEzz72m5r7rvcOx7cEGoWPpT9Gji4j2gC9LEpsFAOa392r2VvBFE72olyyKome5y3V2UMZckT8/s320/name.png) no-repeat 7px 8px;
border:1px solid #ddd;
font-family:Arial,sans-serif;
font-size:13px;
font-weight:bold;
color:hsla(0,0%,27%,0.69);
width:90%;
height:24px;
padding:5px 15px 5px 28px;
vertical-align:top;
display:inline-block;
}
.byard-subsbox-email {
background:#fff url(https://blogger.googleusercontent.com/img/b/R29vZ2xl/AVvXsEi-LU4_Ros9840GyKgi1-LvPW_Ird6GnZMJyAE4vM2BERibJMx_lUcJp88Oe2Nq6J8fcvSLwkwgtwVa6d7XLn_65ILLJY62nnESuQc6v1ksVWaCFlX14fJqs46xxnQ5xwLnyl9-leg4ANo/s320/email.png) no-repeat 7px 10px;
border:1px solid #ddd;
font-family:Arial,sans-serif;
font-size:13px;
font-weight:bold;
color:hsla(0,0%,27%,0.69);
width:90%;
height:24px;
margin-top:10px;
padding:5px 15px 5px 28px;
vertical-align:top;
display:inline-block;
}
.byard-subsbox-name:hover,.byard-subsbox-email:hover {
border:1px solid #bebebe;
box-shadow:0.5px 1.5px 2px rgba(5,95,255,.1);
}
.byard-subsbox-submit {
float:right;
margin-top:20px;
-moz-box-shadow:inset 0px 1px 0px 0px #ffffff;
-webkit-box-shadow:inset 0px 1px 0px 0px #ffffff;
box-shadow:inset 0px 1px 0px 0px #ffffff;
background:-webkit-gradient( linear,left top,left bottom,color-stop(0.05,#ededed),color-stop(1,#dfdfdf) );
background:-moz-linear-gradient( center top,#ededed 5%,#dfdfdf 100% );
filter:progid:DXImageTransform.Microsoft.gradient(startColorstr=&#39;#ededed&#39;,endColorstr=&#39;#dfdfdf&#39;);
background-color:#ededed;
-moz-border-radius:6px;
-webkit-border-radius:6px;
border-radius:6px;
border:1px solid #dcdcdc;
display:inline-block;
color:#777777;
font-family:arial;
font-size:15px;
font-weight:bold;
padding:6px 24px;
text-decoration:none;
text-shadow:1px 1px 0px #ffffff;
}
.byard-subsbox-submit:hover {
background:-webkit-gradient( linear,left top,left bottom,color-stop(0.05,#dfdfdf),color-stop(1,#ededed) );
background:-moz-linear-gradient( center top,#dfdfdf 5%,#ededed 100% );
filter:progid:DXImageTransform.Microsoft.gradient(startColorstr=&#39;#dfdfdf&#39;,endColorstr=&#39;#ededed&#39;);
background-color:#dfdfdf;
}
.byard-subsbox-submit:active {
position:relative;
top: 1px;
}
</style>
    <link href='http://fonts.googleapis.com/css?family=Marmelad' rel='stylesheet' type='text/css'/>
    <link href='http://fonts.googleapis.com/css?family=Merienda' rel='stylesheet' type='text/css'/>
<center>
<div id='byard-subsbox'>
<div id='byard-subsboxh3'>
Subscribe To Our Newsletter
</div>
<div id='byard-subsboxheader'>
<a href='http://goo.gl/6rQJK'><img src='https://blogger.googleusercontent.com/img/b/R29vZ2xl/AVvXsEg_UGGO_nbL_ql3lmyy51iIwyjKNu3v1HV5lcFblFjDIQbyz5pR9LiL9LZ6aDpeLUi4jZPar8A34SsYqmwD6XEEDsGquPaHvV8bAp6qP2jtLuNLqTbP1ptw6DvDL1l58KzcUkZdDik7ZEM/s1600/mail-icon.png' style='float:left;'/></a>
<p style='margin-top:13px;'>
Sign Up Now To Get Free Pro Tutorials About Search Engine Optimization, Blogging Guide, Making Money Online, Giveaways and Much More. It&#39;s 100% Free!
</p>
</div>
<form action='http://feedburner.google.com/fb/a/mailverify?uri=BloggerYard' class='byard-subsbox-form' method='post' target='_new'>
<input class='byard-subsbox-name' name='name' onblur='if (this.value == &apos;&apos;) {this.value = &apos;Your Name&apos;;}' onfocus='if (this.value == &apos;Your Name&apos;) {this.value = &apos;&apos;;}' value='Your Name'/>
<input class='byard-subsbox-email' name='email' onblur='if (this.value == &apos;&apos;) {this.value = &apos;Your Email Adress&apos;;}' onfocus='if (this.value == &apos;Your Email Address&apos;) {this.value = &apos;&apos;;}' value='Your Email Address'/>
<input class='byard-subsbox-submit' type='submit' value='Sign Up!'/>
</form>
<p style='font-family:times new roman;margin-top:10px;font-size:15px;'>
<b>We Hate Spam! </b>Really, It&#39;s terrible and we never do it.
</p>
</div>
</center>
 </b:if>
  • Replace Long Highlighted Message With Your Own.
  • Replace BloggerYard With Your Feedburner Username.
  • Press "Save Template"
  • That's All! 

From The Editors Desk

So friends, How is this simple widget ? I hope you've liked it and you're using it in your blog. If you wish to share this widget on your blog then kindly link back to original post. If you have got any problem then leave a comment below and let's discuss about it. Other many amazing developments are coming soon. So get connected with us for and don't forget to subscribe us. Take care. Cheers!