Subscribe For Free Updates!

We'll not spam mate! We promise.

Showing posts with label SEO. Show all posts

Saturday, October 19, 2013

Submit Blogger Sitemap To Bing and Yahoo

Blogger Sitemap To Bing & Yahoo
In our previous, we discussed aboutsubmitting blogger sitemap to Googleand now it's time to submit blogger sitemap to Bing and Yahoo. As you know that Google is the most popular and world's number one search engine. So it's important for submitting sitemap to Google but in the second number Bing and Yahoo are also little popular. So we should not ignore other search engines. Well, one thing I want to tell you that Bing and Yahoo are connected with each other, So we'll only submit sitemap to Bing and Yahoo will automatically get our sitemap from Bing. Those who don't know that why they should submit sitemap to search engines can read the below paragraph to know about it.

Why You Should Submit Sitemap To Search Engines?

This is the most important thing for every blogger to get the success in blogging. We use to submit sitemap to search engines like Google, Bing and Yahoo. After submitting sitemap these search engine's crawlers come to our site for indexing. After the sitemap is completely indexed then your site will also be visible in search results. And then you'll receive huge organic traffic from search engines.

How To Submit Blogger Sitemap To Bing and Yahoo?

As I told you that Bing and Yahoo are connected with each other so we'll only submit sitemap to Bing and Yahoo will automatically get it from Bing. The steps are same as we submitted to Google in our previous post. First step is to add and verify your blog in Bing webmaster Tools and second one is to submit sitemap. So friends let's start the tutorial.
  • Go To Bing Webmaster Tools >> Sign In To Your Account [If you don't have Bing or Microsoft account then you'll need to create new one]
  • Enter The URL Of Your Blog At The Top and Click "ADD" Button
  • Now When You Will Click on "ADD" Something Will Appear Like The Below Image.
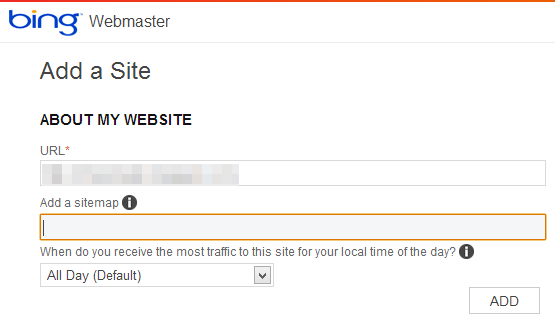
  • In The Add a Sitemap Box, Paste The Following Code.
http://www.yoursite.com/atom.xml?redirect=false&start-index=1&max-results=500
  •  Note : Above code is for 500 posts. If you have more than 500 posts published on your blog then choose the appropriate code from the below box.
For 1 to 500 Posts :
http://www.yoursite.com/atom.xml?redirect=false&start-index=1&max-results=500
For 500 To 1000 Posts :
http://www.yoursite.com/atom.xml?redirect=false&start-index=500&max-results=1000
For 1000 To 1500 Posts :
http://www.yoursite.com/atom.xml?redirect=false&start-index=1000&max-results=1500
For 1500 to 2000 Posts :
http://www.yoursite.com/atom.xml?redirect=false&start-index=1500&max-results=2000
  • After Adding The Appropriate Code, Replace Yellow Highlighted Link With Your Site.
  • Click "ADD" Button. 
  • Now After Clicking "ADD" Button, You Will Be Asked For Verifying Ownership of Blog/Site.
  • You Will See The Meta Tag Copy It And Save It Notepad.
  • Open New Tab in The Browser and Go To Blogger
  • Template >> Edit HTML >> Find For <head>
  • Paste The Meta Tag Below <head> Which You've Saved In Notepad
  • Click Save Template
  • Now Come Back To Bing Webmaster Tools and Click On "VERIFY" Button at The Bottom.
  • Now Your Sitemap Is Successfully Submitted. You Will See In the Dashboard That Sitemap Status Is Pending.
  • So You Have To Wait About a Week To Get It Completely Indexed.
  • That's All.

From The Editors Desk

So, Finally you've submitted your sitemap to main search engines. Now you've to wait about a week to get it completely indexed. After it is indexed, You will receive huge traffic from search engines. Stay in touch with us for our upcoming posts and also subscribe us. Take a lot of care of you and your family. Happy Blogging!

Add Meta Description In Every Post In Blogger

Blogger Meta Description
As you all of you knows that in the new Blogger interface the search preferences section is added which helps the user to make his/her blog more search engine friendly. That section really contains such great things and from today I'm going to discuss with you on each and every part of search preferences section. Well, So today we're going to learn the first part of search preferences which is Meta Description. In the old interface we were unable to use meta description in each and every post, we only used to add that description to homepage only by manually. But now every one can add it in every post and page without touching any HTML or XML coding. You just need to enable it from search preferences section.

What is Meta Description?

Meta description is an HTML or XML element that describes the web page to search engine's crawler. In other words it tells the information about your web page to search engine's crawler so that search engine may provide your web page in search results on proper place. It also shows in the search results page so that the user may know that what kind of page it is. 

Adding Meta Description In Every Post With Blogger

By default in blogger that is disable so we'll need to enable it after that we can use it. In this section the meta tags will enable for homepage only and the last section of this will show you that how can you use these tags for every post. Simply the follow the below steps.
  • Go To Blogger >> Settings >> Search Preferences
  • Look For Meta Tags Section and Tick "Yes" To Enable It.
  • Now a box will appear where you have to write your meta tag or description. Make sure that it doesn't exist 150 characters.
  • Click Save Changes!
Now here is one problem! If you are using custom blogger template then continue reading this. The problem is that sometimes custom blogger templates doesn't work with these meta tags but if you are using blogger default template then it's fine. In order to work properly meta tags with custom blogger templates you will need to insert an short XML code in your template which we will solve this issue. Simple follow the below steps.
  • Go To Blogger >> Template >> Edit HTML
  • Search For <head> and Paste The Following Code Below <head>
<b:if cond='data:blog.metaDescription != &quot;&quot;'>
<meta expr:content='data:blog.metaDescription' name='description'/>
</b:if>
  • Save Your Template and You have successfully added meta tags for homepage.
  • Now let's jump to next step. 

Adding Meta Tags In Every Post

After enabling meta tags for homepage, it's time to add these tags in every post. Now when you will go to any post editor or create new post, You will see "Search Description" section in the sidebar where you have to simply write your description for that post. This search description section was disabled but after enabling for homepage it is also enable for every post and page. 
Write your description for every post in that box and publish it. Is it not so easy?

What's More?

So Friends, That was our first part of search preferences settings which was really pretty easy and so useful. In our next posts we'll talk on each part of search preferences and soon we'll complete the Blogger SEO. If you are facing any problem then leave a comment below. Be in touch with us for more and also subscribe us. Take a lot of care of you and your family. 

Make a Blogger Template SEO Friendly

SEO Optimize Blogger Template
Blogger is a popular CMS which is being used by millions of Bloggers. The best thing of it is that it is owned by Google which helps the web masters to engage their blog with Google and get more traffic from Google. There we can also install custom templates but one thing, most of templates are not SEO optimized because these are designed by different developers. So if you are also using any custom template or default template then you should check that it is search engine optimized or not. If no then you will have to optimize it for getting handsome traffic and improving errors in web master tools account. So in the today's tutorial we are going to learn that how can we make our Blogger Template SEO friendly.

In order to SEO optimize any template we need to do little changes in different part of our template. Below I'm going to discuss that all. You just need to read it carefully along with following the simple steps.

Display Post Title First In Search Results

Have you ever noticed that your post title appears after the blog title in search results ? If yes then continue following this section. First of all look the at the example below.
After seeing the above image, I think you have got my point. The reason why post title should appear first in search results is that when someone is going to search any content he will read the only few beginning words of title now if that words are matched with the content which he/she need then you will enter to that page otherwise he will leave it. In order to display post title first in search results simply follow the below steps.
  • Go To Blogger >> Template >> Backup Your Template
  • Click Edit HTML and Find For Below Code.
<title><data:blog.pageTitle/></title>
  • Replace The Above Code With The Following Code 
<b:if cond='data:blog.pageType == &quot;item&quot;'>
<title><data:blog.pageName/> | <data:blog.title/></title>
<b:else/>
<title><data:blog.pageTitle/></title>
</b:if>
  • Save Your Template & You Have Done! 
  • Let's Jump To Next Step.

Adding Meta Description & Keyword Tags

So, This is another section our post and in this section we're going to add meta description and keywords tags in your blog which will tell the search engine's crawler that in which category your blog is based. It will also help the search engines to show your blog's posts on proper keywords. In order to add meta description and keyword tags, Simple follow the below steps.
  • Go To Blogger >> Template >> Edit HTML
  • Find For <head> and Paste The Following Code Below <head>
<meta content='YOUR BLOG's DESCRIPTION GOES HERE' name='description'/>
<meta content='KEYWORDS GOES HERE' name='keywords'/>
  • Replace YOUR BLOG's DESCRIPTION GOES HERE With Your Description and KEYWORDS GOES HERE With Your Keywords
  • The maximum characters for description is 150 characters and also 150 characters for keywords.
  • Finally Save It !

Optimize Post Title Using H2 Tag

This is said by many professional bloggers that we should use H2 tag in our post titles for better search engine optimization. By default in Blogger, H3 tag is used for post title but using H2 tag will be better. To use H2 tag in post title just follow the below simple steps.
  • Go To Blogger >> Template >> Edit HTML
  • Find For Below Code
    <b:if cond='data:post.title'>
  • You Will See Something or Similar Code Like The Image Below 
  • In the above image you can see in starting that post title starts with H3 tag now you just need to replace H3 with H2 and also replace the ending tag </h3> with </h2>. After replacing you code will look like below image.
  • After optimizing post title, Just save your template and you have done!
  • CONGRATULATIONS! Your Template is successfully search engine optimized!

From The Editors Desk

I'm happy to know that you've successfully search engine optimized your template. I hope this little long tutorial will bring huge benefit to you and your blog. Facing any problem ? Always feel free to ask in comment because your comments are always appreciated. Be in touch with us for more and also subscribe us. Take a lot of care of you and your family. Peace!

Thursday, October 17, 2013

How to Claim Your Blog in Alexa

Few days ago we published article 11 Legal and Excellent ways to Boost Alexa Rank. After this one of our visitor ask me how to claim blog in alexa. So Here write the complete step by step guide to claim your blog in alexa.com
Alexa is given more priority after Google page rank. Many advertisers and visitors judge your blog by looking Alexa rank. Alexa.com is the top most tool to check website ranking
As per Wikipedia’s Alexa definition: “Alexa provides traffic data, global rankings and other information on thousands of websites, and claims that 6 million people visit its website monthly”.
Ranking under 100K is really good which shows the value of your blog. The first step to improve your ranking is to claim your site on alexa and submit your blog details. Alexa have its own systems that index new sites in their database but submitting your site manually is the best way to improve alexa ranking. Here is the complete tutorial on how to claim your blog in alexa. So Lets Start:

11 Legal and Excellent ways to Boost Alexa Rank

Alexa is a web information company and maintains ranking data according to website performance. Performance factors include various things like a blog posting, traffic, reviews etc. These performance factors decide your website overall global and local rankings. Alexa global ranking means popularity of a site from all over the World, and the local Alexa ranking means the popularity of site from the country from which the domain is being registered.
Alexa is given more priority after Google page rank. Many advertisers and visitors judge your blog by looking Alexa rank. So it’s Good to have the Alexa rank to increase your blog popularity and income.  Here I am going to show you best legal and excellent ways to increase alexa rank
Increase Alexa

Legal and Excellent ways to Boost Alexa Rank

1). Claim Your Site in Alexa:

To gain full control claim your site on www.alexa.com this will help others to know about your site and helps to rank better.

2). Install Alexa ToolBar on All Your Browsers:

Alexa is measured by the hits which pass from their system . So you need to install Alexa tool bar  in all your browsers and also tell your friends ,visitors and members of your blog to install Alexa tool bar.

3). Add Alexa widget on your blog or Site:

You can not tell all your visitors to intsall Alexa tool bar so the best way is to use Alexa widget on your blog or site for good ranking. This helps advertisers to know about your site and there by it increases revenue of your blog.
4). Make Browser Startup URL to Your Site URL:
Yes, change your browser default startup url to your site url. If you are using google crome. Google crome default startup url is www.google.com. you need to change this by going to crome setting page.

5). Publish Quality content:

As we always believe that Content Is king. if you  have good content then you can generate automatically backlinks. If you don’t have any good article to publish then don’t publish weak and useless article.

6). Write a Review about Alexa.com:

This is the great tip to  increase alexa rank . Write a review about Alexa on your blog and link it to Alexa.com
Note: If you started your blog recently then don’t write about How to increase Alexa rank- As you have started  blog recently if you write this article many visitors will take that in negative way. So its better to write What is Alexa rank? How to install Alexa widget on your blog

7). Comment On other Niche Blogs:

Comment on commluv enabled blogs  and other blogs which are related to your niche. Commenting on others blog you can generate more backlinks very easily. and getting back links form good website will definitely increase Alexa rank. Don’ forget that Alexa will also include back links for measuring rank.

8). Use Social networking sites:

One of best way to get traffic and increase Alexa rank for a newbie is use of social networking sites like facebook. stumbleupon, Digg and reddit. share your contents on these sites. But Remember don’t share as a spammer.

9). Review about your Blog on Alexa:

Ask your friends, visitors to write a review on alexa, a good review about your site on alexa.com can increase alexa rank.


10). Get target traffic:

Get traffic form bloggers and tech related people this will helps you  to get good Alexa rank.

11). Write new content regularly:

It’s good to update your blog regularly by writing new article. but remember  you always need to provide good quality then Alexa will boost like anything.

Make a Blogger Template SEO Friendly

Internal Linking
Previously, we've completed thediscussion about backlinks or external links and now it's time to understand and improve the internal linking of your blog. As I told you that backlinks are most important for your blog and internal linking is also important because internal linking gives us many benefits to make our blog more search engine friendly and in many things. Internal linking is not so difficult if we compare it to external link building. This is really easy and it can be done in few clicks if you've understood this well. So friends, let's discuss first that what is internal linking and it's benefits then I'll teach you that how you can improve it.

What is Internal Linking In SEO?

Internal links are those hyperlinks which are pointed to another page or content with same domain name. In other words, connecting each and every web page in your whole blog/site is known as internal linking. These links can be added in the menu, content, sidebar or anywhere in your blog/site. See the main image of the post in which you can see that all the pages are connected with each other.

Why To Do Internal Linking? - Benefits

Internal linking is also important like increasing backlinks. There are several benefits of this and let me explain these all. Internal linking will help the search engine's crawler to crawl all the pages or posts of your blog. First, it will come on any post, it will index that post and in the content it will get the internal link then it will land on that internal link and start crawling that too by this if it will be getting internal link in every post then it may index all the content of your blog. This was the first and most important benefit and second one is getting improvement in bounce rate. Internal linking can also improve your bounce rate and it also helps in increasing readership, Page views and Page Rank. 

How To Improve Internal Linking?

So you've now understood the internal linking and now it's time to improve it in your blog. Basically, in internal linking you've to connect your all pages or posts to each other. There are some tips by which you can do this. 

Adding Links In Content

This is the great tip that is being used by most of professional bloggers. You've to add the links on some words or phrases or sentences of your content. After writing the post, look on the words of your post and for example if I've wrote "Increase Backlinks" and previously I've discussed about increasing backlinks then add the link of that post on the text "Increase Backlinks". You should try to find many words and adding links on that. But don't repeat adding same links. You can also create the bullet list like "Recommended For You" with some links. 

Recent Posts and Popular Posts Widgets

Second tip is that add the recent posts and popular posts widgets in your blog. These widgets shows the links of popular or recent posts that can also help in improving the internal linking. Add these widgets in the sidebar because on that places you've chances to increase the Page views. 

Related Posts Widget

This the great widget which can improve the internal linking of your blog because every professional blogger is using this widget and it really helps. Add the related posts widget below every post which shows some related or recommended posts to the users of your blog. 

Better Navigation Menu

Another thing is that, You've to build the good navigation menu in which all the categories will be added. Make sure these are not labels or tag pages and create another pages like our's SEO page for each category and add them in the navigation menu. This will make your blog easy to navigate and also help in internal linking.

Sitemap Page

This is another great idea which can improve internal linking of your blog. Create the sitemap page of your blog and it in the navigation menu. Sitemap page consist of the whole content of your blog which's links will be categorized there. From that sitemap page, your readers can pick any topic and grab that content and once the search engine's crawler reach on that page then you've chances of getting all the content indexed.

Final Words

Finally, You've understood the internal linking. Still not? Feel free to ask in the comments area. I hope this little post is gonna help you in understanding and improving the internal linking. If you've more ideas then please do share with us in comments because sharing is caring. Get in touch with us for more and also subscribe us. Take Care. Happy Search Engine Optimizing!

How To Improve Internal Linking Of Your Blog

SEO Optimize Blogger Template
Blogger is a popular CMS which is being used by millions of Bloggers. The best thing of it is that it is owned by Google which helps the web masters to engage their blog with Google and get more traffic from Google. There we can also install custom templates but one thing, most of templates are not SEO optimized because these are designed by different developers. So if you are also using any custom template or default template then you should check that it is search engine optimized or not. If no then you will have to optimize it for getting handsome traffic and improving errors in web master tools account. So in the today's tutorial we are going to learn that how can we make our Blogger Template SEO friendly.

In order to SEO optimize any template we need to do little changes in different part of our template. Below I'm going to discuss that all. You just need to read it carefully along with following the simple steps.

Display Post Title First In Search Results

Have you ever noticed that your post title appears after the blog title in search results ? If yes then continue following this section. First of all look the at the example below.
After seeing the above image, I think you have got my point. The reason why post title should appear first in search results is that when someone is going to search any content he will read the only few beginning words of title now if that words are matched with the content which he/she need then you will enter to that page otherwise he will leave it. In order to display post title first in search results simply follow the below steps.
  • Go To Blogger >> Template >> Backup Your Template
  • Click Edit HTML and Find For Below Code.
<title><data:blog.pageTitle/></title>
  • Replace The Above Code With The Following Code 
<b:if cond='data:blog.pageType == &quot;item&quot;'>
<title><data:blog.pageName/> | <data:blog.title/></title>
<b:else/>
<title><data:blog.pageTitle/></title>
</b:if>
  • Save Your Template & You Have Done! 
  • Let's Jump To Next Step.

Adding Meta Description & Keyword Tags

So, This is another section our post and in this section we're going to add meta description and keywords tags in your blog which will tell the search engine's crawler that in which category your blog is based. It will also help the search engines to show your blog's posts on proper keywords. In order to add meta description and keyword tags, Simple follow the below steps.
  • Go To Blogger >> Template >> Edit HTML
  • Find For <head> and Paste The Following Code Below <head>
<meta content='YOUR BLOG's DESCRIPTION GOES HERE' name='description'/>
<meta content='KEYWORDS GOES HERE' name='keywords'/>
  • Replace YOUR BLOG's DESCRIPTION GOES HERE With Your Description and KEYWORDS GOES HERE With Your Keywords
  • The maximum characters for description is 150 characters and also 150 characters for keywords.
  • Finally Save It !

Optimize Post Title Using H2 Tag

This is said by many professional bloggers that we should use H2 tag in our post titles for better search engine optimization. By default in Blogger, H3 tag is used for post title but using H2 tag will be better. To use H2 tag in post title just follow the below simple steps.
  • Go To Blogger >> Template >> Edit HTML
  • Find For Below Code
    <b:if cond='data:post.title'>
  • You Will See Something or Similar Code Like The Image Below 
  • In the above image you can see in starting that post title starts with H3 tag now you just need to replace H3 with H2 and also replace the ending tag </h3> with </h2>. After replacing you code will look like below image.
  • After optimizing post title, Just save your template and you have done!
  • CONGRATULATIONS! Your Template is successfully search engine optimized!

From The Editors Desk

I'm happy to know that you've successfully search engine optimized your template. I hope this little long tutorial will bring huge benefit to you and your blog. Facing any problem ? Always feel free to ask in comment because your comments are always appreciated. Be in touch with us for more and also subscribe us. Take a lot of care of you and your family. Peace!