Subscribe For Free Updates!

We'll not spam mate! We promise.

Saturday, October 19, 2013

Setup Custom Domain In Blogger With Namecheap

Namecheap.com is a popular web hosting service which is being used by millions of people. It is listed in top 10 best web hosting providers. In other side, Blogger is also famous in best blogging platforms. Blogger allows you to create about hundred blogs in a single account. You can use free sub domain forever in your blog but if you're interested in removing .blogspot.com and place only .com there then you will need to buy the domain name from any web hosting service like Namecheap, Godaddy and Hostgator. If you have bought any custom domain from Namecheap.com and want to set in with your Blogger blog then this article along with tutorial is specially for you because here we're going to learn that how can we setup custom domain in Blogger with Namecheap.

Setup Domain From Namecheap In Blogger

So, First of all make sure that you've purchased a domain from Namecheap and You're easily accessing your domain. If you've not purchased then do it now and then follow the simple steps below.
  • Go To Blogger >> Settings
  • Click on +Add a Custom Domain
  • Go To Switch To Advanced Settings
  • Now a Box Will Appear Where You Have To Enter The Domain. [i.e : www.yourdomain.com]
  • After Entering The Domain, Click "Save" Button and Then You Will See The Error Like The Below Image.
  • In The Above Error, They Are Asking To Verify Your Domain. They Have Given Two CName Records Which I've Mentioned in The Above Image, You Have To Add These CName Records In Your Domain in Order To Verify It. Simply Follow Below Steps.
  • Open New Tab in Browser and Go To Namecheap 
  • Login Into Your Account and Go To Manage Domains.
  • Open Your Domain There and Go To "All Host Records" From The Left Side Menu.
  • Now Here You Have To Create Two CNAME Records. 
  • In The Second Row, You Can See That First Column (Host Column) is Havingwww, in The Second Column (IP Address/URL Column) Put ghs.google.com,in The Third Column (Record Type Column) Select CNAME(Alias) and SetTTL as 1800.
  • Now Come Down at The Sub Domain Settings
  • Here In The First Row, Fill First Column With Little Code Which Is Placed Blogger at Left Side Below www, Second Column With Long Code Which Is Below ghs.google.com in Blogger, Choose CNAME(Alias) In The Record Type and The Last Set TTL as 1800.
  • Now Make Sure That You've Done Correctly and Also Confirm It By Seeing The Below Image.
  • After Adding CNAME Records Carefully Now Save Your Records By Pressing The "Save Settings" Button At The Bottom Of Page.
  • Now Open The Blogger Tab and Also Press Save Button There.
  • You're Almost Done But One Little Thing Is Remaining Which Redirecting yourdomain.com to www.yourdomain.com. This is Really Important and Not so Difficult.
  • Just Refresh The Blogger >> Settings Page and Click "Edit" In Your Domain Setting. 
  • Now a Check Box Will Appear Like The Image Below, So Just Tick it and Hit "Save" Button.
  • CONGRATULATIONS! You Have Successfully Installed Custom Domain In Your Blogger Blog. 
  • That's All!

From The Editors Desk

So friends, This was our custom Namecheap domain which we've used in our blogger blog today. So I hope that this post will you little bit in installing custom domain. If you are facing any problem then leave your comments below. We'll reply you back upon our review. Stay connected with us for more and also subscribe us to get hot updates. Take care of you and your family. Cheers!

Submit Blogger Sitemap To Bing and Yahoo

Blogger Sitemap To Bing & Yahoo
In our previous, we discussed aboutsubmitting blogger sitemap to Googleand now it's time to submit blogger sitemap to Bing and Yahoo. As you know that Google is the most popular and world's number one search engine. So it's important for submitting sitemap to Google but in the second number Bing and Yahoo are also little popular. So we should not ignore other search engines. Well, one thing I want to tell you that Bing and Yahoo are connected with each other, So we'll only submit sitemap to Bing and Yahoo will automatically get our sitemap from Bing. Those who don't know that why they should submit sitemap to search engines can read the below paragraph to know about it.

Why You Should Submit Sitemap To Search Engines?

This is the most important thing for every blogger to get the success in blogging. We use to submit sitemap to search engines like Google, Bing and Yahoo. After submitting sitemap these search engine's crawlers come to our site for indexing. After the sitemap is completely indexed then your site will also be visible in search results. And then you'll receive huge organic traffic from search engines.

How To Submit Blogger Sitemap To Bing and Yahoo?

As I told you that Bing and Yahoo are connected with each other so we'll only submit sitemap to Bing and Yahoo will automatically get it from Bing. The steps are same as we submitted to Google in our previous post. First step is to add and verify your blog in Bing webmaster Tools and second one is to submit sitemap. So friends let's start the tutorial.
  • Go To Bing Webmaster Tools >> Sign In To Your Account [If you don't have Bing or Microsoft account then you'll need to create new one]
  • Enter The URL Of Your Blog At The Top and Click "ADD" Button
  • Now When You Will Click on "ADD" Something Will Appear Like The Below Image.
  • In The Add a Sitemap Box, Paste The Following Code.
http://www.yoursite.com/atom.xml?redirect=false&start-index=1&max-results=500
  •  Note : Above code is for 500 posts. If you have more than 500 posts published on your blog then choose the appropriate code from the below box.
For 1 to 500 Posts :
http://www.yoursite.com/atom.xml?redirect=false&start-index=1&max-results=500
For 500 To 1000 Posts :
http://www.yoursite.com/atom.xml?redirect=false&start-index=500&max-results=1000
For 1000 To 1500 Posts :
http://www.yoursite.com/atom.xml?redirect=false&start-index=1000&max-results=1500
For 1500 to 2000 Posts :
http://www.yoursite.com/atom.xml?redirect=false&start-index=1500&max-results=2000
  • After Adding The Appropriate Code, Replace Yellow Highlighted Link With Your Site.
  • Click "ADD" Button. 
  • Now After Clicking "ADD" Button, You Will Be Asked For Verifying Ownership of Blog/Site.
  • You Will See The Meta Tag Copy It And Save It Notepad.
  • Open New Tab in The Browser and Go To Blogger
  • Template >> Edit HTML >> Find For <head>
  • Paste The Meta Tag Below <head> Which You've Saved In Notepad
  • Click Save Template
  • Now Come Back To Bing Webmaster Tools and Click On "VERIFY" Button at The Bottom.
  • Now Your Sitemap Is Successfully Submitted. You Will See In the Dashboard That Sitemap Status Is Pending.
  • So You Have To Wait About a Week To Get It Completely Indexed.
  • That's All.

From The Editors Desk

So, Finally you've submitted your sitemap to main search engines. Now you've to wait about a week to get it completely indexed. After it is indexed, You will receive huge traffic from search engines. Stay in touch with us for our upcoming posts and also subscribe us. Take a lot of care of you and your family. Happy Blogging!

Submit Blogger Sitemap To Google

Blogger Sitemap
After completing on page SEO of Blogger, Now it's time to work with off page Blogger SEO which is most important. In off page SEO, we will do many things but in the today's post we're going to submit blogger sitemap to Google. This is most important part of SEO. You must be thinking that How it is most important ? So, this is really important. Just read this complete post and then ask yourself that it is really important ? Ok, So first of all let me tell you that what is sitemap ? Read the below paragraph to know about it otherwise if you know about it then you can continue to next portion.
Dont Miss : Tips To Write SEO Friendly Blog Posts

What is Sitemap ?

Have you concentrate on the word sitemap or have you ever think about that word sitemap? The words is already telling that I'm the map of any site or blog. Didn't get it ? let me explain. It is the map of your blog/site which contains every post or page of your blog. It is used for better navigation and also for submitting it to search engines to get indexed your whole blog in search engines.

How Submission Of Sitemap To Google Works?

So, submitting sitemap to Google is important. Let me tell you that how it is important. First of all, someone creates a blog and publishes about 10/15 posts. Then it is time to submit sitemap to search engines. When you will submit your sitemap to Google it means you have sent an application to Google for indexing the whole blog of you. When Google completely indexes your sitemap and now when someone will search any keyword in Google after that if that keyword belongs to any post of you then your post may comes in search results. It means after indexing your blog in Google then your blog's posts will appear in search results. Is it not important ? Hope you've got this point. Let's start the tutorial friends.

Submit Blogger Sitemap To Google

So, This tutorial contains two main and important steps. In the first step we'll verify our blog in Google webmaster tools so that your blog may easily index completely and quickly and in the second step we'll submit the sitemap. So let's begin with first step.

Verify Your Blog In Google Webmaster Tools

In order to verify your blog, Go To Google Webmaster Tools. Now there you will see your blog in the homepage and that is automatically added to webmaster tools because Blogger is owned by Google and it used to automatically add blog in webmaster tools for better service. If your blog is not added then you also add it manually. So now follow the simple steps below to verify your blog.
  • Go To Webmaster Tools Homepage  >> Look for your blog
  • Click "Manage Site" Button In The Right Side and Go To "Add or Remove Users"
  • Click "Manage Site Owners" and Go To Verify Using Different Method
  • Tick Mark "HTML TAG"
  • Now a meta tag code will appear, copy it and save it in notepad or any other text editor.
  • Now open a new tab in browser [ Note : Don't Close Webmaster Tools Tab ]
  • Go To Blogger >> Template >> Edit HTML
  • Search <head> and paste the meta tag below <head> which you've saved in notepad.
  • Click "Save Template"
  • Open the webmaster tools tab and click on "VERIFY" button in the bottom of the page.
  • After clicking verify button, You will see the congratulations message that you've successfully verified your blog in webmaster tools. Now it's time to submit the sitemap. Let's jump to next step.

Submitting Sitemap To Google

  • Go To Your Blog's Dashboard 
  • Click "Optimization" In The Left Side and Go To "Sitemaps"
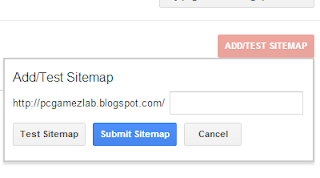
  • Click On "Add/Test Sitemap"
  • Copy The Code Below and Paste It In The Text Box and Press "Submit Sitemap"
atom.xml?redirect=false&start-index=1&max-results=500
  • Note : The above code is for 1 to 500 posts and if you have more than 500 posts published on your blog then just copy the two lines below and paste it on that text box and add it twice. 
atom.xml?redirect=false&start-index=1&max-results=500
atom.xml?redirect=false&start-index=500&max-results=1000 
  • CONGRATULATIONS ! You've have successfully submitted sitemap to Google. Now you have to wait about a week for completing the indexation. 

What's More?

So It was our sitemap which we've submitted to Google. When your sitemap is successfully indexed then you will see your posts appearing in search results. But one thing Google shows those posts on top which are unique and quality. So try to make your blog's posts more unique and quality in order to drive handsome traffic from Google. In our next post we'll learn that how can we submit sitemap to Yahoo and Bing search engines. So be in touch with us for more and also subscribe us to get hot updates in your blog. Take a lot of care of you and your family. Happy Blogging!

Custom Robots Header Tags Setting In Blogger

Custom Robots Header Tags
If you are using Blogger to manage your blog then you may probably know that few months ago Blogger engineers had introduced new interface which is having fantastic features. The main thing of that new interface is that there is 'Search Preferences' section added in the settings area. That section helps us a lot to make your blog search engine friendly and to gain handsome traffic from search engines. In our previous posts we discussed about some things of search preferences which were meta description tagsrobot.txt file and custom 404 error pagebut here we're going to discuss about custom robots header tags setting which is also a part of search preferences settings.


Basically, custom robots header tags setting is similar to robots.txt file because these both things are about to tell the search engine's crawler for which area they should index or not. But there is on difference. In robots.txt file we used to write the command and in custom robots header tags we'll need to tick mark some check box. If you tick mark correct fields then there is a chance of getting traffic even more from search engines. This will also help you to increase the visibility of your blog in search results. You can use custom robots header tags correctly with the help of below tutorial. So go and get it now.

Custom Robots Header Tags Setting

  • Go To Blogger >> Settings >> Search Preferences
  • In The Crawlers and Indexing Section, Edit Custom Robots Header Tags and Tick "Yes" To Enable It.
  • Now A Long Box Will Appear Where You Have To Tick Mark The Fields. Tick Mark Some Important Fields With The Help Of The Image Below.
  • After Ticking The Fields Properly, Click "Save Changes" and You Have Done!

What's More?

So these were our custom robots header tags and it seems that we've completed the search preferences section and also on page SEO of Blogger. So in our next posts we're going to discuss about some Off Page SEO topics. Be in touch with us for more and also subscribe us to get hot updates straight in your inbox. Cheers!

Add Custom Robots.txt File In Blogger

Blogger Robots.Txt File
In our previous, we had discussed about creating professional 404 error page and here we're back with another great and most important tutorial for all of you. Today we're going to enable a custom Robots.Txt file in Blogger which can really help you to index your blog in Google faster and it will also make your blog more search engine friendly. Robots.Txt file is used in every website but in the past with old Blogger interface we're unable to add that file in our blogs but now in the new interface which is really amazing with a lot of great features we can enable that file in Blogger. Those who don't know about Robots.Txt file can read the below passage to understand that file.

What is Robots.Txt File ?

That is a simple text file in which the website owner use to write the commands for the search engine's crawler. It means that we can instruct the search engine's crawler with that file that we part of our site can be indexed or not. That commands are written in different coding which is only for search engine's crawler. You can see your robots.txt file just by following the below URL.
http://www.yourdomain.com/robots.txt

 What Areas You Should Disallow For Crawling In Your Blog?

So, This question maybe coming in your mind that which areas of your blog you should disallow for crawling. In fact, You can disallow any area of your blog but there are some important areas for disallowing. If you disallow those areas then you blog will be more search engine friendly and that areas are Search Result pages, Archive pages and labels pages. However, Below I'm giving you an search engine friendly robots.txt file which will help you a lot.

Enable Custom Robots.txt File In Blogger

So, This process is so easy just follow the simple steps below.
  • Go To Blogger >> Settings >> Search Preferences
  • Look For Custom Robots.Txt Section In The Bottom and Edit It.
  • Now a check box will appear tick mark "Yes" and a box will appear where you have to write the robots.txt file. So if you want to use our file then copy the code below and paste it in that box.
User-agent: Mediapartners-Google
User-agent: *
Disallow: /search?q=*
Disallow: /*?updated-max=*
Allow: /
Sitemap: http://www.yourdmomain.com/feeds/posts/default?orderby=updated
  • Note : The first line "User-agent: Mediapartners-Google" is for Google AdSense. So if you are using Google AdSense in your blog then remain it same otherwise remove it. 
  • Click "Save Changes".
After adding the file now you must be wanted to understand your file that what we have allowed and disallowed. So, I've listed every command with detail below.

Explanations

  • User-agent: Mediapartners-Google : So, This is a first command which is for those blogs which are using Google AdSense if you are not using Google AdSense then remove it. In this command, we're telling the AdSense's separate robot that crawl all pages which are having AdSense Ads.
  • User-agent: * : Here the User-agent is calling the robot and * is for all the search engine's robots like Google, Yahoo etc.
  • Disallow: /search?q=* : This line tells the search engine's crawler not to crawl the search pages.
  • Disallow: /*?updated-max=* : This one disallows the search engine's crawler to do not index or crawl label or navigation pages.
  • Allow: / : This one allows to index the homepage or your blog.
  • Sitemap : So this last command tells the search engine's crawler to index the every new or updated post.
Got It ?

How Can I Add a Command For Disallowing Any Page?

So if you are interested in adding your own command then you can also do it. Here is an example for disallowing the contact page Disallow: /p/contact-us.html . So, first you will need to replace /p/contact-us.html which is other part of the domain with another. It mean you just need to exclude the main domain and just type remain part of the page. Two things you should remember that add your custom command below User-agent: * and per line = per command. If you still have not got it then ask in comments please.

What's More ?

So friends, It was our robots txt file which is going to help you definitely. We will be back with other great tutorials of search engine optimization. So be in touch with and also leave your feed backs in the comments section because your comments are always appreciated. Take a lot of care of you and your family. Cheers!

Create Professional 404 Error Page In Blogger

Blogger 404 Error
As we're discussing on Blogger's search preferences setting today here I'm back with another amazing tutorial and a professional 404 error page. After reading the title of the post, You've known about our today's topic. So let's begin the discuss. In the past with old Blogger interface we're unable to create a custom error page but now it's possible because now that option is also available in search preferences settings. In the past when someone enters into a not found page, The blogger used to show a message which was extremely different from original blogs. Well, These are old things which are now modern. Those who don't know about 404 Error page can read the below passage to understand it.

What is 404 Error Page ?

It is a web page which is being used by all websites to show the error when someone enters into a broken or not found location. In other words, when you enter an incorrect address then that page appears. Basically, In that page the error message and some options are added for better navigation. Got it ?

Professional Error Page

So, here I've brought a professional 404 error page or not found page for all Bloggers. This page is professional because of it is designed with CSS3 and it contains some great options for better navigation. First of all have a look on it.

Features

This page has some good features which I've listed below.
  • Full Page Width : This page has full width which will hide your sidebar widgets section and that is what which makes this page more professional.
  • User Friendly Message : It contains a user friendly message which will tell your readers that they have entered into an error page.
  • Go Back Link (JavaScript Link) : Go back link is also added so that if your readers was reading an article then accidentally he/she clicked on any broken link and with the help of Go back link he/she will get your article back easily.
  • Report Problem To Us (Link To Contact Page) : The reason of adding contact page link is that if any page of your blog is deleted then the user may report to you for better service.
  • Go To Homepage (Link) : So this is a common homepage link for better navigation.
  • Stylish Search Box : We've added an stylish search box in that page you that if your visitor is about to find something then he/she may search it easily with that search box.
  • Big 404 Logo : In the last, this page contains a big 404 logo by which let your readers know that they have landed on a broken link or not found page.

How To Install This Page ?

Well, After reading about that professional error page now everybody may want to install it in their blogs. So this is free for everyone and you can easily install it by following the simple steps below.
  • Go To Blogger >> Settings >> Search Preferences
  • In the Crawlers and Errors Section, Look For Custom 404 Page and Click on "Edit".
  • Now a box will appear where you have to paste the following code.
<!-- Blogger Yard 404 Page -->
  <p style='line-height: 30px'><strong>
<font color='#ff0000' size='5'>
Oops!
</font> <font color='#666666'>
Looks like you either clicked a broken link or a page that you were looking for doesn't exist. <br/> Kindly do one of the followings:
</font></strong></p>
  <ol style='line-height: 25px'>
    <li><a href='javascript:history.go(-1)'>&#171; Go Back</a> </li>
    <li>Report the Problem to us by <a href='CONTACT PAGE URL'>Clicking Here</a>&#160;&#160;&#160; (<em>This will help us serve you even better</em>) </li>
    <li>Go To Homepage by <a href='HOMEPAGE URL'>Clicking Here</a>
      <br/></li>
<li>Search Anything Using Below Search Box</li>
  </ol>
<br />
 <center><form _lpchecked='1' action='/search' class='search-form' id='search_mini_form' method='get'>
<input id='searchinput' name='q' onblur='if (this.value == &apos;&apos;) {this.value = &apos;Type Here & Hit Enter&apos;;}' onfocus='if (this.value == &apos;Search the site&apos;) {this.value = &apos;&apos;;}' type='text' value='Type Here & Hit Enter'/>
<input id='searchbutton' style='vertical-align: top;' type='submit' value='Search!'/>
</form></center>
  <p>
    <br/>
    <br/>
    <br/></p>
<p align='center'><font size='5'>Page Not Found!</font></p>
<br /> <br /> <br />
<p align='center'> <font style='font-size:150px; font-weight:bold;' color='red'> 404 </font></p>
<style>
.status-msg-wrap {
    font-size: 100%;
    margin: none;
    position: static;
    width: 100%;
}
.status-msg-border {
    display:none
}
.status-msg-body {
    padding: none;
    position: static;
    text-align: inherit;
    width: 100%;
    z-index: auto;
}
.status-msg-wrap a {
    padding: none;
    text-decoration: inherit;
}
#sidebar-wrapper, #midsidebar-wrapper, .gapad2, .blog-pager, .post-header-line-1, .post-footer , #rsidebar-wrapper { display:none !important;} #main-wrapper { width:98%!important;} .post { width:98%!important; }
#searchinput {

background: #FFF url(http://1.bp.blogspot.com/-DqsSIdDHoXE/UC7emvfWcII/AAAAAAAAAwo/X7HUuvC4oBs/s000/search.png) no-repeat 7px 8px;
background-color: #FFF;
border: 1px solid #ddd;
color: #A0A0A0;
display: inline-block;
font-family:arial;
font-size: 12px;
font-weight:bold;
height: 24px;
width:300px;
margin: 0;
margin-top: 5px;
padding: 5px 15px 5px 28px;
vertical-align: top;
}
#searchinput:hover{
border: 1px solid #bebebe;
box-shadow: 0 1px 2px rgba(5, 95, 255, .1);
padding: 5px 15px 5px 28px;
}
#searchbutton {
background:#444;
color:#fff;
height:35px;
border-radius:5px 5px 5px 5px;
box-shadow:1px 2px 1px 1px #ABABAB;
border:1px solid #fff;
margin-top:3px;
padding:8px;
}
#searchbutton:hover{background:#555;}
</style>
  • Replace "CONTACT PAGE URL" With Your Contact Page Link
  • Replace "HOMEPAGE URL" With Your Homepage Link 
  • Click "Save Changes" & You Have Done!

How To Check This Page ?

After installing this page, now you must want to see that page that how it looks like in your own blog. In order to check that page, enter any incorrect url of your blog in the address bar and hit enter. Look at the example below.
http://www.yourblog.blogspot.com/anythingcanbehere
http://www.yourblog.blogspot.com/blablabla
Got it ?

What's More ?

So friends, It was our custom 404 error page which is really fantastic. I hope this will help you in making your blog more professional. In our next post we're going to learn about custom page redirection in blogger. So be in touch with us more and don't forget to subscribe us to get hot updates straight in your inbox. Take a lot of care of you and your family. Cheers!